

|
The Wheel of Fortuneless
or
How To Succeed In Wheel Making
Without Really Trying
Another “Alterna-Slots” how-to by Weird Jack
Prerequisite: Tire Casting 101
 Okay fellow weird ones, here is a continuation of the tire casting stuff you have all been actively doing now. Haven’t you? Let’s say you have one or two wheels that you really like, but can’t find the mates to them. Or like me, you may just enjoy putzing around building and racing cars on home tracks, yet can’t shell out the fortunes involved every time you need new or NOS wheels for a car project. What’s a slothead to do? Enter stage right…. our old friend “casting resin”. This material has more than sufficient strength for home and club track use and will give you an unlimited source of cool scale wheels. So gather ’round weird ones, choose your favorite wheel, save yourself several shekels while casting your way to further slot car freedom! To the Basement Slotman! Oops… sorry, I get carried away…..
|
1. Begin with the tire mold you have made previously to cast your silicone tires in… |
Figure 1 shows the tire mold with an axle stub in place.
 |
2. Next, select a wheel that you wish to copy in resin and place it face up on a flat surface. Fill the face of this wheel with the same silicone you make your tires from. (Suggestion: Choose a simple wheel to learn with! Don’t do what I did and begin with an 8-spoke Cooper wheel. |
Now mount this wheel face down on the axle stub that is in the tire mold (Figure 2). Align the back of the wheel with the top surface of the tire mold.
 |
3. Pour silicone into the tire mold as if casting a tire. In essence, this is exactly the same process as tire making (Figure3). |
 |
4. Once the silicone has cured, remove this “tire” from the tire mold. Again, this is the same as tire casting (Figure 4). |
| 5. Remove the “wheel master” and axle stub from the silicone “tire”. This tire is now a “wheel mold” (Figure 5). |  |
 |
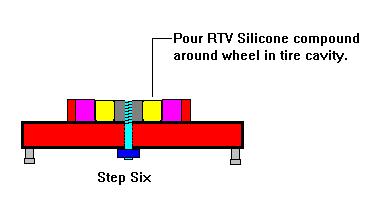
6. Place the axle stub back into the silicone “wheel mold” (Figure 6). |
| 7. Place the Wheel Mold with axle stub into the Tire Mold… fitting the axle stub back into the hole there (Figure 7). This insures the finished wheel will have a true axle hole. An alternative is to use a flat block with a true hole drilled into it rather than the Tire Mold. You can do it either way. |  |
 |
8. Pour in the resin of your choice (Figure 8). There is no hurry here… I would suggest a resin with a fair cure time to allow you to get the bubbles worked out for fewer bad casts. |
| 9. When the resin has cured solid, remove the finished resin wheel from the mold (Figure 9). Give the resin a chance to really cure though, or you risk ovaling the axle hole. Then slide the axle out and you have your resin wheel ready to paint and mount. |  |
Additional:
![]() I like to heap a little resin up on top of the back of the wheel when pouring it. This forms a small cone-shaped bolster that adds to the axle hole length.
I like to heap a little resin up on top of the back of the wheel when pouring it. This forms a small cone-shaped bolster that adds to the axle hole length.
![]() An alternative would be to cut a 3/8″ section of styrene tubing and mount that on the axle prior to casting the wheel. Cast this tubing right into the wheel to form an axle bolster after the resin has cured.
An alternative would be to cut a 3/8″ section of styrene tubing and mount that on the axle prior to casting the wheel. Cast this tubing right into the wheel to form an axle bolster after the resin has cured.
![]() This casting method can be used to duplicate most vintage American metal wheels also, complete with 5-40 threads cast in place.
This casting method can be used to duplicate most vintage American metal wheels also, complete with 5-40 threads cast in place.
![]() If you need axles for European type wheels, a great alternative is to cut lengths of 3/32″ piano wire. This can be bought in 36″ lengths at any hobby shop for about 85 cents!
If you need axles for European type wheels, a great alternative is to cut lengths of 3/32″ piano wire. This can be bought in 36″ lengths at any hobby shop for about 85 cents!
For a list of supplies & sources, refer back to “Tire Casting 101”
Check out Jack’s Web Page! “The Weird World of Jack”
For more information about Jack’s “Road Monkey” silicones: “Rocket Science Road Monkeys”
Related posts:
 Silicone Tire Casting 101
 Silongies, You Ask? Making silicone coated sponge tires!
 Proxy Race II Prototype Car Building
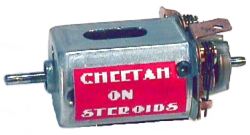 A Cheetah on Steroids
 Formula One/Indy Chassis Project
 Ninco Mercedes Upgrade Project
 1970 NCC Rules
 The First Slot Car Big Mag “How To” – by Josh Bauer
 Advice from an Old Weird Slot Car Racer
 Regaining Control